Pages

Tuesday, November 27, 2012

I'm plain vanilla.


One of my favorite things to make is vanilla. Yep, you heard that right. I make my own vanilla. And bottle it. And give it to friends and family. Do you want to know how? Well that's what I'm here to tell you today, my dear reader.

It all started waaaayyyyy back in July. Seriously. Don't think you're going to go whip up some vanilla today. It ain't gonna happen. But what you CAN do is mark your calendar now for some vanilla making fun in July. Or June. But don't wait til the end of July, you'll be behind the eight ball.

First, go to Sams and buy a gallon jar of pickles. THAT, you can do now. They cost around $5. Do you know why you want pickles to make vanilla? Because it's the cheapest gallon glass jar you will find anywhere. Look on amazon and you'll see they aren't $5. So, get the pickles, dump the contents (or eat them, whatever. But if you eat them all at once, prepare to blow up like a blowfish with all that salt.), and soak the empty jar in a bleach water solution. You may do this a couple of times before you lift it to your nose and no longer smell pickles. Frankly, the lid may be harder to remove the smell from than the glass. Beware. On second thought, you should get started now.

Next, order 1 1/2 pounds of vanilla beans. I get mine on amazon, but there are many merchants on the internet that can hook you up. I prefer Madagascar vanilla beans. You'll also need brown glass bottles, 8 oz. size. Again, the internet is your friend. Here's an option for you. This recipe will make you 13-14 bottles, so keep that in mind when ordering. And last, head to the liquor store. You'll need 2 liters of vodka. I've done this both ways, using the cheapest brand and then a pricier version. There was no difference at all. Seriously. So buy the cheap stuff.

When you get home with all your items in hand, grab a friend, because this is way more fun to do with a friend (isn't everything in life??). And sit down at the table. You'll need about 30 minutes to snip your beans. You're going to take a sharp pair of scissors and begin cutting the beans vertically from the bottom up. BUT, when you get about an inch from the top, stop cutting. You want them to look like a wishbone when you finish each bean, halved, but still connected. This allows the inside of the beans to saturate your alcohol. So drop them into the jar as you go.

When you're finished cutting, pop open those bottles of vodka and pour them in. Fill it all the way to the top. And then put the lid on, pat yourself on the back, and stick it in the back of your pantry. You're done!

Once a month, as you remember, go back to that bottle in the pantry. Pick her up, invert her a couple of times, and set her back in the corner again. You'll notice the first month the liquid is still pretty clear, but as the months pass, it will get darker and darker. Yippee! It's steeping! And since you have months to prepare, get on etsy and find some cute labels you can have printed to put on the front of your bottles once they are complete.

And then the day will come (in December, or 6 months after you began) when you will need to bottle those babies up and pass them out. Here's how that looked for me today.
I gathered my bottles and vanilla, along with my ribbons and labels and went to town.


I used a funnel to help me pour. It's kind of messy anyway.


Before putting on the lid, I stuck one bean inside each bottle and cut it down to size. Just for fun. And then it was time to add labels and ribbons, both of which are optional. But cute.


And now, having read this, you are an expert, too! Get out there and make this mama proud!

Monday, November 26, 2012

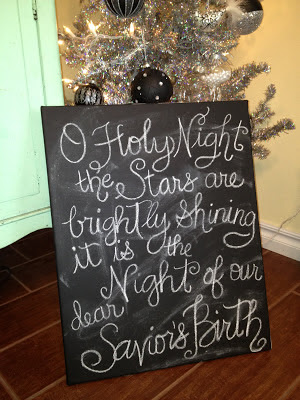
O Holy Night

I have been going a little nuts this week. I get all Christmas spirity and something happens. I'm a project completing fool. Perhaps it's the desire to create a home that my family likes to be in. Or maybe it's the fact that I have 20 friends coming over in 5 days for a party. Not sure which.

Anyway, my favorite way to create is to use something I already have and repurpose it. I'm all about a "free" project. Sunk cost, and all.

So today I dragged an old canvas out of the garage and made it new! It was inspired by a picture I saw on pinterest. And frankly, I'm a little afraid of posting it for fear of the pinterest police coming after me and shutting down this silly blog I have going. So, go search, people. You'll know it when you see it.

Here's how the whole thing began...


That was a sassy little number I did about 5 years ago. Aaaand, it has sat in my garage for about 2 years now. That can there? It's chalkboard paint.

I gave the whole thing two coats and got to chalking!


Of course I made a couple mistakes along the way. Because I'm a perfectionist. And imperfect (see previous blog). So I decided to incorporate the mess into the final look. I'm sure it could be nicer. But I like it, just how it is. I hope you do, too.


Merry Christmas!

Saturday, November 24, 2012

Time to get our Christmas on!

Oooooh Boy!! I am so excited for Christmas this year. I caught the bug about two weeks ago, which I know was way to early. But I couldn't help it. I started printing my Christmas cards, planning my parties, and anxiously awaiting the day that was socially acceptable to erect my tree. And yippee! It's here!

This week I have slowly but surely put out all the decorations. But my very favorite thing to hang is my Advent calendar. And let me tell you about this calendar. Many years ago (10, I believe?), Martha Stewart had a picture in her magazine, which of course I subscribed to. It was a darling white mantel with a string of socks hanging across it. The socks were those muted greens, greys, and blues she used to do everything with. And they were CUTE. I mean, I was inspired. I started thinking about where I could put my socks on a string. I had no mantel at the time (house #4) but I was undetered. I set my mind to having the Martha Stewart sock Advent calendar.

And that was when I happened upon Gymboree. They were selling their end of season socks for 75 cents a pair. And these socks were adorbs (as my daughter says). They were not anything like Martha's socks, but they were perfectly appropriate for kids. And so I bought my 12 pairs and went on my merry way.


I came home and filled these socks with junk from the dollar section at Target and candy. Lots of candy. I hung them on a string from my closet and I clothespinned them on with old clothespins in my house, some of which had letters on them from my "teaching" days. Who cared. They were fun. The kids loved them! And all was well.

Through the years I've altered my initial mission. No more toys that go in the trash a month later. Now it's filled with the occasional dollar bill and piece of candy, but mostly with strips of paper that represent something to DO. Like what? you ask. Well, one may have "bake cookies with mom" or ""starbucks run with dad." I also have things like "game night" and "walk the dog with mom" and "hot chocolate by the fire." The point became doing life together, not spending money.

But this year, I looked on these socks with a longing. To make them cuter. To make them look nicer. More me. And that's when I headed out to Hobby Lobby and Michaels to find some number stickers. I tried this last year also, but strangely, number stickers were hard to find. ??!!

Then I cut a new jute line, spray painted the ugly clothespins, and strung her up in her rightful place.


Isn't she cute?! I'm in love. And I can't wait to fill her up this week with missions to complete and joy to be had. Merry Christmas y'all!

Friday, November 16, 2012

I'm not perfect, just forgiven.

This is my motto:


See that tree? It's a little off. Kinda like me. I like to stand tall and look pretty, but actually, I'm less than perfect. Like WAY less. In fact, my older, bigger, wiser sister once told me something very meaningful. I was lamenting over a friend that I loved dearly, but whose perfect life always made me feel inferior. And that's when Beth told me this:

Everyone shows you what they want you to see. She may have perfect hair and makeup all the time, and her baseboards may never have dust on them. But there are things you're doing that she's not! So what your baseboards aren't dust free? Your kids are happy! Your home is fun and loving! You can't compare yourself to what you see on the outside of someone else's home!

And this is my advice to you today, as we venture into the month of parties and plays and gifts, oh my! The world of Santa and reindeer and elves on shelves. Remember this, dear reader! YOU CAN NOT DO IT ALL! AND IT'S OKAY!! If the elf doesn't move for a few days... did the world really end? Only take on what you can handle. And say NO to the rest. You can do it. I believe in you!!

But most of all, keep it real. Your REAL friends know your heart. You don't have to worry about your floor being spotless, because they aren't looking at it! Your baseboards maybe. But never the floor! ;) wink wink!


I soooo can't wait to get out the decorations this year. Don't judge me.

Wednesday, November 14, 2012

Put on your bra! Mama's gonna be on TV!

Well oh my goodness, if yesterday didn't turn out to be a crazy day, I don't know what would be!

One minute, I'm sitting around my house wearin jammies and a houserobe, and minding my own bidness (I know I spelled that wrong, Mom. Don't correct me.) and the next minute I'm shining in my 15 minutes of fame!

You see, my chickens, The Girls, got to make their tv debut courtesy of this mama right here. And all because last night the City of Norman was voting on the Chicken Ordinance. We were in favor of the ordinance passing. Obviously, because we want to keep our hens. Hello. And a friend of mine who works for the local news channel asked if I'd be interested in letting them film a little spot in my backyard. ABSOLUTELY! I replied. And then I made a mad dash for the bathroom where I stripped off those afore mentioned jammies and threw on a little leopard ditty and some mascara. And the rest is history!

You can see that first spot here. And yes, I said first, because the fame and notoriety didn't end there.

Around 6:45 I arrived at the City Council meeting. I sat with my sweet and obedient son in the back row. Then I waited and listened. There were a lot of things on the agenda before the chickens came to pass. Some time later the moment arrived. They asked for community input and a darling little old man got up and spoke in support of the ordinance. I was feeling fine about not speaking out until a kooky woman made her way to the podium and passionately talked about how smelly my (our-collectively) chickens will be and how she desperately didn't want it to pass. The whole while my kids were sitting on either side of me egging me on to get up and speak. I know, I'm so punny!!

I started getting a feeling in my chest (the one I get when I'm fired up to speak my mind). So I lept out of my seat and headed up to the microphone. I told them how we considered our chickens pets and family members. How preposterous it is to believe that the waste from 4 small chickens could possibly smell up an entire neighborhood. And how people want to follow a growing movement. LET US OWN OUR OWN CHICKENS IN PEACE! I YELLED! Ok, maybe I'm exaggerating. But once I said what I had to say I sat down. And they voted soon after.

Guess what? It passed! 8-1, in favor. Hallelujah, we don't have to give away the birds or worse yet (gasp!) put them in a pot for dinner!

Here are the other two interviews. For your entertainment pleasure. These happened after I stepped out of the council meeting and saw these two sweet reporters in the hall who wanted to interview me about my chickens. Haha! Who knew those silly birds would bring such fame to the Frakes family.


Channel 5 ABC news

Fox News

Tuesday, November 13, 2012

Before and After Part Deux

So I know you've been on pins and needles, my sweet reader. You're DYING to see the rest of that house, aren't you?! Well wait no longer, friend. Let us commence with part deux of our happy adventure in remodeling...

Here's the laundry room, right off the kitchen. It leads to the backyard, and hence the pool.


And then there are the stairs in the entry... oh boy, they needed some help, don't you agree??


I did my best...


There was this lovely bathroom at the top of the stairs.


That we did our best to fix up without breaking the bank...


And then there were our kids rooms. For some reason I can't find pictures of the girls room. Poop. It was darling, too. But my son's room started out like this. There will be more on the furniture you see later...


The fabulous Amy Laubach painted that mural on the wall. And we paid a carpenter to build that bed right there in the room. It was the coolest freakin' thing ever. EXCEPT when you had to make that bed. And then it sucked.

Moving on, upstairs, the guest bedroom must have been the previous owner's cat retreat, because it smelled like a cat had taken up a competition on who could make the smelliest box ever in there. Although we never saw a litter box. Which made things even more disturbing and hard to eradicate.


And here it was in it's post apocolyptic stinkiness. Smelling sweet, I might add.


And then there was a precious little bathroom upstairs... Tucked into the attic practically.


And we lightened it up.


The last room upstairs was a bonus room of sorts, above the garage. It's potential was never quite realized by our family. Because by then, let's be honest, we were out of money and oomph. But we changed the carpet and painted it and made it a clean, quiet space for the kids to play and make a mess.


Why, yes! That IS two-toned carpet in there! :)
Aaaaaand, there isn't an after picture to be had. But imagine it, dear reader. It was nice.

And last but not least, quite possibly my favorite room in that house. There was a bathroom off the kitchen downstairs that was ugly. And I mean UGLY. And that was the place where all our guests used the restroom and you went when you came in from the pool. Well the year before we bought and remodeled this house we went to an Art Fair and bought our very first piece of actual art. It's a painting of The Mont, here in Norman. We love it!! And the artist who made that painting had given us a tile of each of his other pieces. We used those tiles to create a unique bathroom that is fun to look around. And that is what I present to you now, last, but certainly not least.

BEFORE:


AFTER:


And this sweet little niche? It was my happy place, under the stairs, where I would hide. And create. And sit still.

Recognize the chair?? wink wink.

*A final note on this sweet house... All the before pictures you have seen here are the house AFTER we purchased it. So all that furniture in the bedrooms? Left for us. All the food in the kitchen cabinets we tore out? Ours. All the clothes hanging in the closets? Sent out to that clothes heaven in the sky. We literally spent an entire dumpster, just throwing away trash, and whatever furniture we couldn't give away or keep. So when I say we invested blood, sweat, and tears into that home? I mean it. I only hope that future owners of that precious place will enjoy it for years to come. :)

Friday, November 9, 2012

Before and After

I LOVE a before and after. Don't you? To see an ugly space made new gets my creative juices flowing. So today I was inspired by this new website I recently found, courtesy of my sweet friend, Susan, who knows I love a good redo project. It's called BetterAfter. Check it out when you're done here. You'll love it!

I offer you now some of the before and after pictures of one of our old houses. We've had six. Yes, six houses. Don't ask. And this was the most fun in transforming. Proooooobably because we spent an ungodly amount of money doing it. And that's always fun. Until all your life savings are tied up in a mortgage... and then there's another blog for another day.

Anywho, without further ado, I present our house in Hall Park, Norman, Oklahoma. Purchased for a steal... 3,000 square feet for $150,000. Don't worry, you will see quickly why we had to buy it so cheap. It needed a LOT of help.


Obviously, before...


And after. Do I need to explain the many things that are different here? Hopefully you can see for yourself. The rest I will leave you with for your own observation. They need no words, really.


The front living room:


The back living room:


The bar turned into this desk:


The kitchen:


The Master Bedroom:


Master Bath:


Now, this has been a labor of love, my friends. So we'll call this part one. And I'll do part two later, with about 7 more rooms to go. Hope you enjoyed them as much as we enjoyed redoing them!